VMware is a popular virtualization platform that allows multiple virtual machines (VMs) to run on a single physical host computer. VMware works by abstracting compute resources from the underlying hardware, providing a virtual operating platform for each virtual machine.
One key capability of VMware is the ability to create new VMs from virtual machine disk (VMDK) files. VMDK files contain the boot disk image and data for a virtual machine. By using an existing VMDK file, new VMs can be quickly spun up without having to do a fresh operating system install or configure applications.
This article provides a comprehensive, step-by-step guide on creating a VM from a VMDK file using VMware. Following this guide, any user can quickly deploy VMs from VMDK images for testing, development, or production environments.
Understanding VMware and VMDK
VMware Workstation, ESXi, and vSphere are popular hypervisor platforms that provide commercial virtualization capabilities. These VMware products install on bare metal servers or desktop OSes like Windows and Linux.
Once the hypervisor is running, users can create, run, monitor and manage virtual machines that share resources from the underlying host. Each VM contains a virtual hard disk file in VMDK format.
VMDK stands for Virtual Machine Disk. This file format encapsulates a complete bootable virtual machine OS file system. VMDK allows VMs to exist separate from hardware as files that are portable between host systems.
Key advantages of using VMDK files for VM creation include quick deployment, portability, and flexibility. VMs boot rapidly from preconfigured VMDK images. And VMDK files can be easily copied, shared and re-used for additional VMs.
Preparing for Virtual Machine Creation

Before creating a VM from VMDK, some preparation is required:
Ensuring Compatibility
The VMDK file must be compatible with the VMware platform being used. Modern versions of VMDK work in VMware products. But it may be that the vmware vmfs datastore inaccessible or older versions of VMDK may have compatibility limitations. Consult your VMware documentation to ensure that the VMDK file type/version works with your hypervisor.
Obtaining the VMDK
Get access to an existing sysprepped VMDK file that can boot or have a VMDK image created from a physical system using VMware vCenter Converter. Common sources include VMDK templates publicly shared by vendors/communities or internal IT VMDK golden images.
Checking System Requirements
Review the VM hardware specifications contained in the VMDK such as CPU, memory, networking needs along with the guest OS version. Ensure the underlying VMware hypervisor host has adequate resources to deploy the VM. CPU, memory, disk and I/O allotment must be sized appropriately.
Understanding Configuration
In addition to compute/storage sizing, also understand the VM guest OS credentials, software specifics, and network configuration contained in the VMDK. This info will be needed post-deployment for VM access, troubleshooting and integration with environment.
Steps to Create a Virtual Machine from VMDK
Step 1: Open VMware Software
Launch the VMware vSphere Client or vCenter management interface. Log in using credentials for an account with permissions to create new virtual machines.
Step 2: Creating a New Virtual Machine
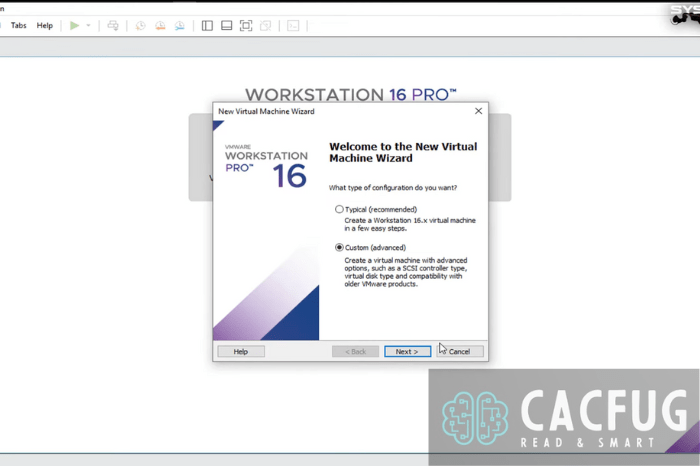
Click to create a new virtual machine. Select the option to customize hardware and OS settings during creation. Input a VM name and choose guest OS (must match VMDK guest OS). Allocate CPU cores, memory, network connections based on the VMDK or target workload specifications.
Step 3: Attaching the VMDK File
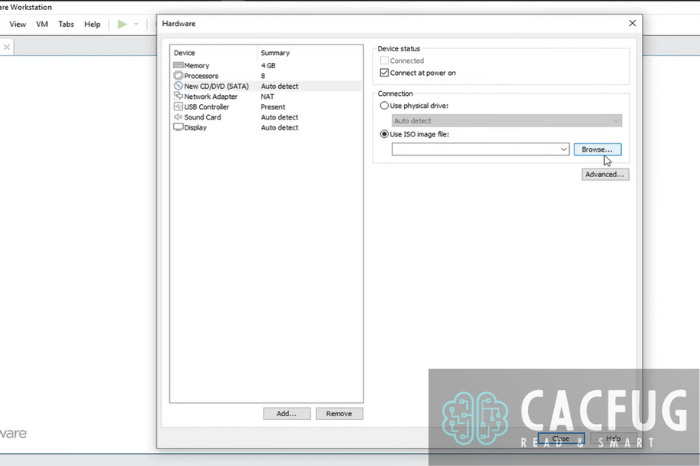
In the VM storage settings, choose to attach an existing VMDK image. Browse and select the downloaded VMDK file. Ensure the VMDK file version and guest OS type match what was defined for the new VM.
Step 4: Configuring Additional Settings
Adjust any other VM options as desired such as resources shares, host placement, guest customization specs and storage policies. The defaults are generally sufficient.
Step 5: Finalizing and Starting the Virtual Machine

Review all VM settings to validate accuracy. With everything configured correctly, finalize VM creation. Select the new VM in inventory, right click and choose Power > Power On to boot it from the attached VMDK.
Monitor the console as the VM boots up using the OS and applications initialized within the VMDK file.
Troubleshooting and Common Issues
Addressing VMDK Compatibility Issues
- Check the VMware Hardware Compatibility List to validate the VMDK version is supported.
- Upgrade older VMDK formats using VMware OVF Tool or vCenter.
- Convert incompatible VMDK files to open virtualization format (OVF) first.
Resolving Configuration Errors
- Adjust virtual CPU, memory, disk allocation to meet VMDK hardware specs.
- Reattach VMDK file and select appropriate SCSI controller mode if needed.
- Enable virtualization extensions (VT-x/EPT) in BIOS if disabled.
Troubleshooting Boot Failures
- Disable secure boot in VM settings if VMDK has Linux/non-Windows OS.
- Expand virtual storage to accommodate large VMDK system images.
- Update VM compatibility/virtual hardware to match guest OS version.
- Rebuild VMDK if file corruption prevents boot or causes blue screen.
Best Practices and Tips
Backup the VMDK File
- Always clone or back up the original VMDK file before making changes.
- Verify backups restore properly in an isolated test environment.
Update VMware Regularly
- Keep ESXi hosts, vCenter Server, and management tools updated.
- Updates provide latest features, performance enhancements, and security patches.
Optimize Virtual Machine Configuration
- Allocate vCPU, memory, storage IOPS based on workload needs.
- Overprovisioning leads to resource contention, underprovisioning causes bottlenecks.
- Balance resources using performance monitoring and analytics.
Utilize Snapshots
- Take snapshots before making substantive changes to VM or VMDK.
- Snapshots capture VM state to easily revert back in case of problems.
- Snapshot commit ensures disk changes persist and saves storage space.
Conclusion
Deploying VMs from VMDK files enables fast provisioning of preset systems for testing or production use cases. Following this step-by-step guide, anyone can leverage VMware’s capabilities to quickly spin up new VMs from existing VMDK images.
We covered key concepts ranging from VMDK fundamentals to a walkthrough of the VM creation process using the vSphere client. With this foundation, readers can start experimenting with virtualization powered by VMware and VMDK files.


